Daily Desmos Day 5

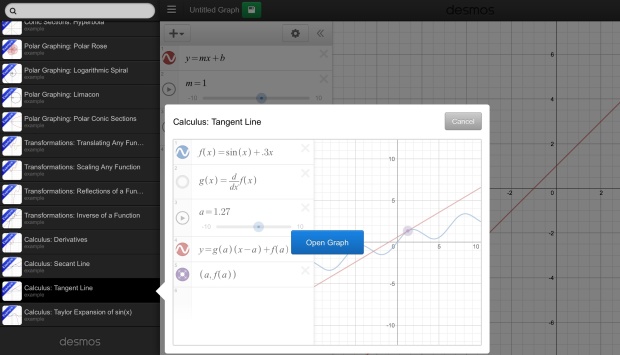
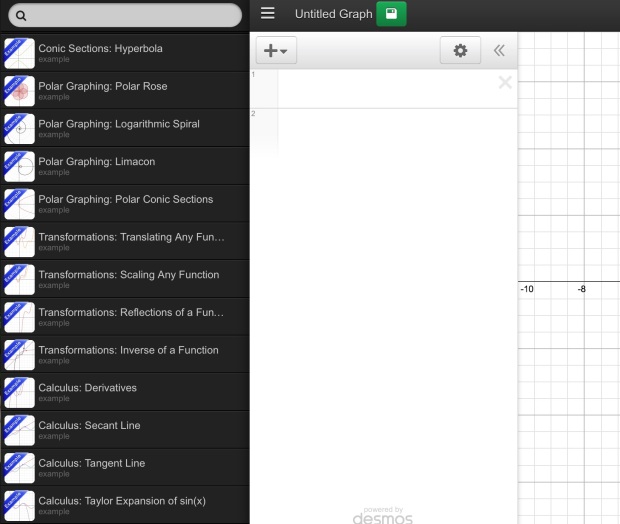
Finally we’re at day 5. Another great feature of Desmos is that you have access to a number of ready-made templates. These range in content from graphing lines to calculus.

Templates

If you have an account with Desmos anything you create can be saved for later in this menu. To access you have to select the icon in the top left corner of the sheet.

Desmos_Graphing_Calculator_and_Spotify_-_Less_Is_More_–_Cool_Kids_Riptide__Originally_Performed_by_Echosmith_and_Vance_Joy_

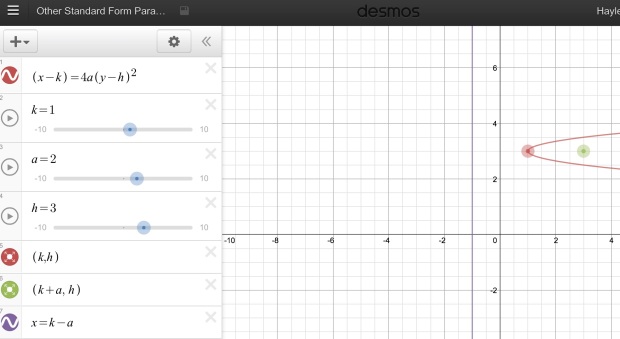
Here you can see that the last graph I created was called “Other Standard Form Parabola” and I could open this file to demonstrate during class or search for it in the search bar above. So I encourage you to get an account and start compiling resources.

Daily Desmos Day 4

Ok so it’s been more than a day but I am excited to share my other Desmos ideas with you!

Desmos offers class activities too! It’s Teacher website allows students to inquire and explore mathematics through interactive activities. One of my favourites is the function carnival.

Function_Carnival_by_Desmos

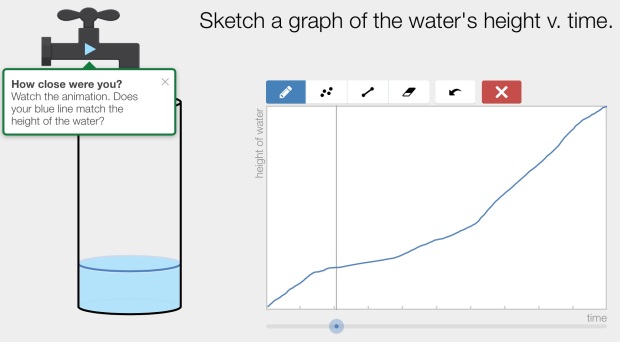
You are given a class code so that your students work is saved to your account. You see all entries as pictures in the table and can select any for closer inspection.

Water_Line_by_Desmos

Student work for each exercise is stored under the activity title visually so you can compare student work at a glance. Function carnivals focus on position-time graphs is great at confronting common student misconceptions by illustrating how time always moves forwards. This is harder to communicate through a static graph or worded example. Here the students experiment and create, and by doing so develop a deeper understanding of the nature of travel graphs.

Water_Line_by_Desmos2

In addition to function carnival which is beautiful at illustrating travel graphs, the Desmos Teacher activity centre offers activities on functions, volumes and algebra as problem solving with patterns. I hope that they are developing more because there resources are very effective!

In a nutshell, the Desmos Teacher Activities are dynamic, illustrative and student-centered. They are a great addition to your teaching toolkit. Let me know how you find these activities or how you use them in your classroom.

Daily Desmos Day 3

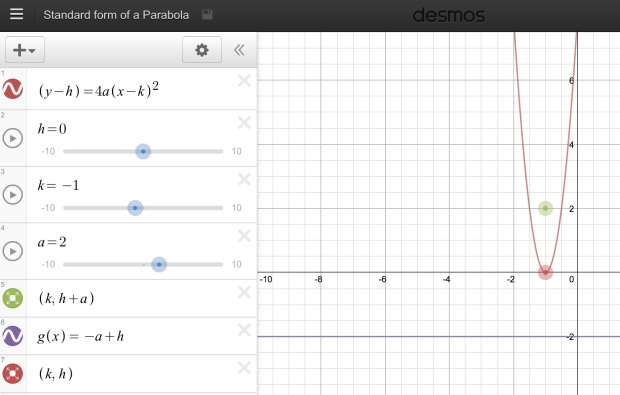
This next one is one of my Desmos activities that I use with my senior students. If you have a Desmos account (which is free and makes activities easy to set up before time and just link to) you can save it to your templates. This helps you explore the standard form of a parabola by clicking and dragging the focus or by moving the sliders to show the infinite possibilities from the standard form.

Standard_form_of_a_Parabola

Or you could use the other Standard form

Other_Standard_Form_Parabola

I think these work well for demonstrating how all parabolas fit into the standard forms. Let me know how these resources work for you or if you have a similar resources.

Daily Desmos Day 2

It’s often better to have students explore concepts and identify patterns themselves through investigation. Thats why I prefer to introduce the gradient-intercept form of a line with the following Desmos activity.

I start the lesson by showing students a collection of different lines with their equations on them and ask pairs to establish patterns in the shape and equations of lines. I then ask my pairs to pair up to discuss competing theories before the groups of four share the findings with the class. This is called “Think-Pair-Share” and it helps students communicate their ideas in a non-threatening way. It often helps the discussion as students don’t feel like their ideas are “too silly to share” because they have been bounced off three peers before being shared with the class. It also opens up some interesting vocabulary debates which consolidate understanding of terminology and general mathematical ideas.

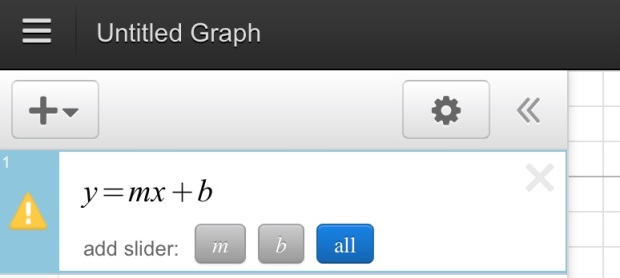
Once the theories are “chalked” up on the whiteboard, I get the students to open Desmos and type “y=mx+b” into the input bar on the left hand side. Desmos will then ask you “Add sliders”? Choose the blue “all” button.

Add Sliders

Desmos will draw the line with the sliders for the gradient and intercept set at one.

Gradient-Intercept_form

Now you can choose the animate icon to the left of m and b to see the sliders move smoothly to illustrate the affect of changing the gradient and the y-intercept.

I end the lesson by a matching activity between the equations and their graphs to consolidate student understanding.

How do you teach the Gradient-Intercept formula? Share your tips and techniques in the comments below.

Daily Desmos Day 1

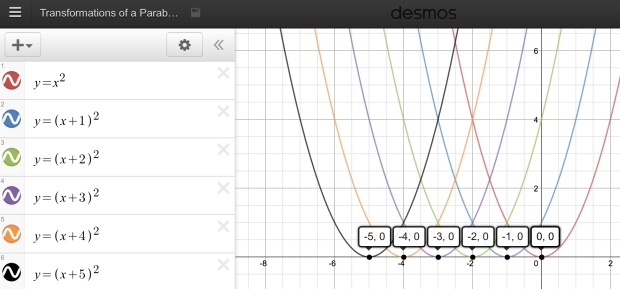
When teaching transformations of functions one traditionally spends a significant amount of time sketching various transformations of each function. This has always been a great way to illustrate the “shift” yet a lot can be lost in the amount of time and effort each function takes to sketch. Then I found Desmos.

Transformations_of_a_Parabolic_Function

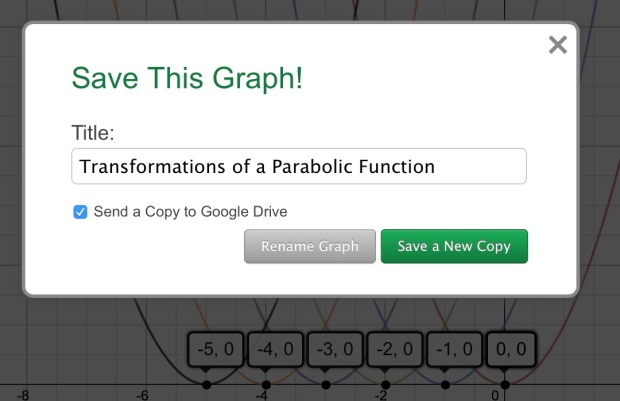
Desmos can sketch large numbers of functions on the same graph almost instantly. This shortens the time it takes to illustrate the idea of shifting parent functions. Also you could break students into teams to explore different transformations if you are short on time (which most of us are). You can share your graphs by linking to your google account and choosing save.

Desmos Save graph

So here is one resource I’ve used multiple times to explore transformations to functions. Investigating Absolute Value Transformations. I hope that it proves useful to you.

Designing Student-Centered Activities with Desmos

Teaching at a BYOD school brings its own unique set of challenges. The steepest learning curve for me has been finding resources I can use which will work perfectly on any brand of computer. These resources are called “platform independent” because they do not rely on a particular operating system to function effectively. One of my favourite finds is Desmos.

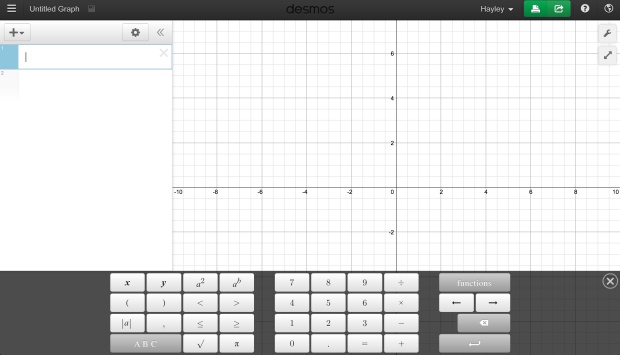
Desmos_Graphing_Calculator

Desmos is a visual, free graphing calculator which requires a newer web browser like Chrome (which can be downloaded here). Desmos elegantly explores all things Coordinate Geometry with such idiot-proof design that it is particularly suited to student-centered activities or for the technologically challenged teacher. Students can explore concepts in an easy yet engaging manner. I have also found it particularly helpful in demonstrating concepts when teaching Functions and elementary Calculus.

You don’t have to take my word for it but it is worth checking out. Head to Desmos and start playing.

Desmos_Graphing_Calculator2

There is a growing user and resource base to help you out, including a thorough user guide. To further persuade you to try this resource, I’m going to post a Desmos activity I have designed each Day for the next week. Remember that feedback is appreciated and I would love to hear your own Desmos Activity ideas.

As always, I look forward to learning with you.

Google Form Warm Ups

I have recently been using Google Forms to give me real-time feedback on student learning. I use this for diagnostic assessment purposes to inform my approach to lessons either at the beginning of a lesson to gauge foundational understanding or at the conclusion of the lesson to determine whether students are ready to build on the concepts previously taught.

To try out this technique you can follow these simple steps:

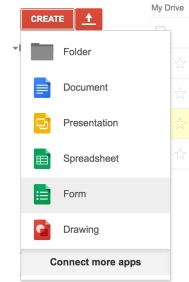
1. Create the Google Form. Choose the create icon in your Google Drive and select “Form”.

Create_-_Google_Drive


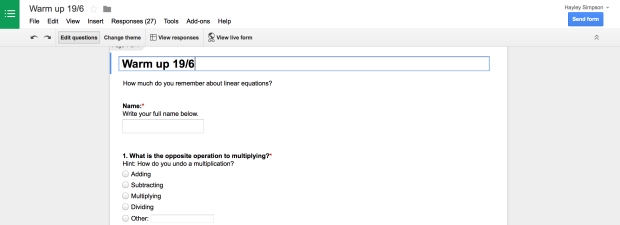
2. Type your questions to assess student understanding. Be sure to include a “Name” or “Email” section if you want to identify individual students.

 Warm_up_19_6_-_Google_Forms

3. Complete your Form. This is so that you have an answers key when you go to grade it.

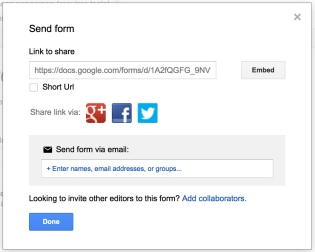
4. Share or link to the Form. Choose the blue “Send form” button in the top right hand corner. Share the Form with the students in the class or obtain the link to the form from the Share menu.

SendForm_-_Google_Forms

5. Grade assessment. Go back into your Google Drive and enter the Responses sheet for your Form which automatically appears underneath your form. Choose “Add ons” and “Flubaroo” (which can be added through “Get add- ons” if not already present). Flubaroo will ask you to “Grade assessment” where you will select the response to grade all subsequent responses against. Naturally choose your answer response which should have the earliest timestamp or your name.

Flubaroo-_Google_Sheets

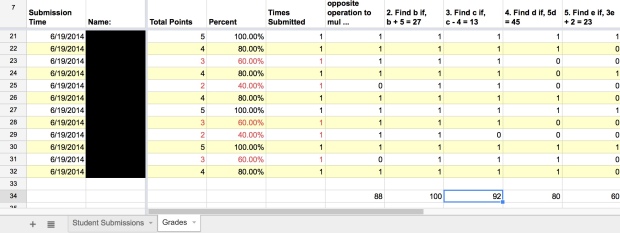
6. Analyse your data. You can now see at a glance where some common misconceptions and misunderstandings lie and can address them before attempting to build on a shaky foundation.

Graded-_Google_Sheets

So my post-holiday diagnostic revealed that 12% of my students couldn’t remember opposite operations and 40% struggled with the two step equation (though a few ran out of time for the last two questions). In addition I get to keep this information electronically to help me talk about the improvement of individual students understandings etc.


I hope that this info-torial helps you give Google Forms a try in your diagnostic assessment procedures.

First Things First

Slowly but surely my first year of teaching is coming to an end yet somehow at the same time it has flown by. Looking back this year has delivered on its promise to be an incredibly gruelling and challenging year. I’ve learnt that teaching is one of the most demanding and rewarding things one can do.

I feel as though I could do better if I did this year over but such is the nature of learning. Mistakes help us to grow and learn, for a teacher they refine our practise. However I feel that it is my responsibility to impart my newly acquired wisdom for any new teachers starting out this coming year.


1. Set small realistic goals. The first year of teaching is the epitome of too much information too quick. It is important to focus on specific aspects of teaching at once. For example research and experiment with formative assessment techniques one week and classroom management theories the next. When you focus on one particular issue you can achieve much better mastery over that area instead of worrying about everything at once.

2. Reflect, take a growth mindset. Use your mistakes not as judgements of your incompetence but as part of your learning process. Take note of when methods were successful as well as unsuccessful. For a mistake not to be a failure you must use it to grow your practise not weigh on your self esteem. Keep track of your progress with a reflection diary or blog. This should help you see your improvement.

3. Celebrate successes. Share your victories with your colleagues. We fight so hard to find effective methods of teaching our students that when something works everybody deserves to know about it. It is the most amazing feeling when you really start mastering a method or when an educational risk pays off. Sharing your experiences will assist other teachers.

4. Forgive yourself. Things will not always go to plan. Even the most meticulously planned activity may go astray. Whether the factors at play are in your control or not you must reflect on what went wrong and why but at the end of the day you must forgive yourself and keep trying. The quality teaching fairy is destined to reward you blood sweat and tears eventually so power through disappointment.

5. Find a mentor. Locate yourself a veteran teacher to show you the ropes. Though you may not agree on everything its important to respect the years of experience other teachers bring to the staffroom. Gems of advice can help you avoid some common pitfalls of teaching. Also none understands the pain of the first year of teaching better than a teacher. In addition to mentors at school I follow the example of @thenerdyteacher , @cybraryman1 , @mrkempnz , @AddesaAT and @ddmeyer on their professional twitter profiles and blogs.

6. Establish a PLN: local ideas are not the only ones worth hearing. Establishing a professional learning network can give you inspiration and support on a global scale. PLNs keep you up to date with the educational theories and approaches around the globe. Your PLN can become a virtual staffroom where international teachers learn from one another and innovate together. My PLN of choice is twitter. To learn with me go to @hayleysimpson89


It is known that people learn most in challenging times and you, new teachers, are about to learn a lot and fast. Model lifelong learning because this isn’t just an intense year of your life, it’s a lifestyle. You are a teacher now.
For the Love of Feedback

Every teacher with more than a weeks experience is brutally aware of how crucial formative assessment is to ensuring students are learning in your classroom. However in my first term as a teacher I felt like I was drowning under the weight of formative assessments that I had been generating in my classroom. So I began to ponder, how do great teachers stay on top of formative assessment? How can I assess my students frequently without generating hours of work for myself? (Hours that good teachers don’t have).


For assessment to concentrate on student growth the feedback needs to be given as immediately as possible. The further students are from the assessment, the less invested they are in the feedback. So after a week of careful contemplation, here are my top 5 fast feedback methods;


1. Technology assisted feedback

Use some quick warm up questions to be answered on a technology platform like Google forms which collect responses instantaneously (depending on your internet connection) and provide instant statistics. For Google forms student results and trends can be illustrated with the Add-on Flubaroo. I find this invaluable to identifying weaknesses and misconceptions at the beginning of the lesson before I try to build on a shaky foundation. I can adjust the lesson to address misconceptions before building on them.


2. Entry and exit slips

On technology or paper, entry and exit slips provide me snapshots into student understanding each lesson. Downside, there is a day delay unless done via technology. For differentiated instruction each entry or exit slip contains choices like a menu. The choices are colour coded based on their difficulty. Students are encouraged to attempt the red questions if they are feeling confident or if they keep getting the orange questions correct.


3. Eyes down thumbs up

A method of gauging student confidence about a topic. Thumbs up for “I get this”, sideways for “Im okay but I might need some help” and thumbs down for “I don’t get this yet”.


4. Think-pair-share

Students ponder an application question for several minutes before pairing up with a partner and refining their solution. After a suitable amount of time either pairs may pair into fours or the pairs may present their solution or part of their solution to the question to the class. Many variations of this technique exist. One of my classes is a “Performance class” and love applying their skills to summarising mathematical concepts or solving problems creatively.

5. Whiteboards

A tried yet proven method where students display answers on their mini whiteboards and holding them up to show the teacher. The simplicity of this form of assessment does not cheapen its effectiveness.


I encourage you to think about how you formatively assess your students. Have a try of some of the techniques above and let me know how they work for you. Also if you use any different techniques let me know! What are your top 5?

The Rite of Passage

Last thursday I underwent another one of the legal “rites of passage” of a new teacher by being observed by my school principal. Although an incredibly stressful situation it turned out to be a highly constructive affair. I received many words of encouragement and constructive criticism from an education veteran who is passionate about the future of education, particularly the role of technology in this future.


One specific encouragement she afforded me was the nature of my entry slips or warm ups. Inspired by the urgings of my twitter friends or “tweeps” I have developed a method of conducting these warm ups using technology, specifically Google forms.

Image

Photo from Keso S: bit.ly/googlelegopic

In a nut shell the students are linked to the google form or type in the bit.ly customised link into their task bar. Once there, students are prompted to enter their name and then answer a short number of questions based on foundational knowledge of the coming lesson or revision questions from the previous lesson.


I display the responses on the Interactive Whiteboard so students are encouraged by seeing their submission register on the screen. I personally adjust the width of the browser so the students answers remain hidden but their name displays. When students finish they pass their devices to students who forgot to bring/charge theirs.


After the submissions are in, I select “Add-ons – Flubaroo – Grade assessment” and select the answers I entered when I created the form. The add on “grades” the responses which shows instantly trends in answers and students which may need more help during the lesson. If they class under performs in a question sometimes I spend some time to revisit that concept before continuing with the lesson.


Give it a go! It will surprise you how quick and easy this is! Alternately, If I have spooked you with my wordy explanation stay posted for a pictorial or feel free to ask me.